
Main Courses
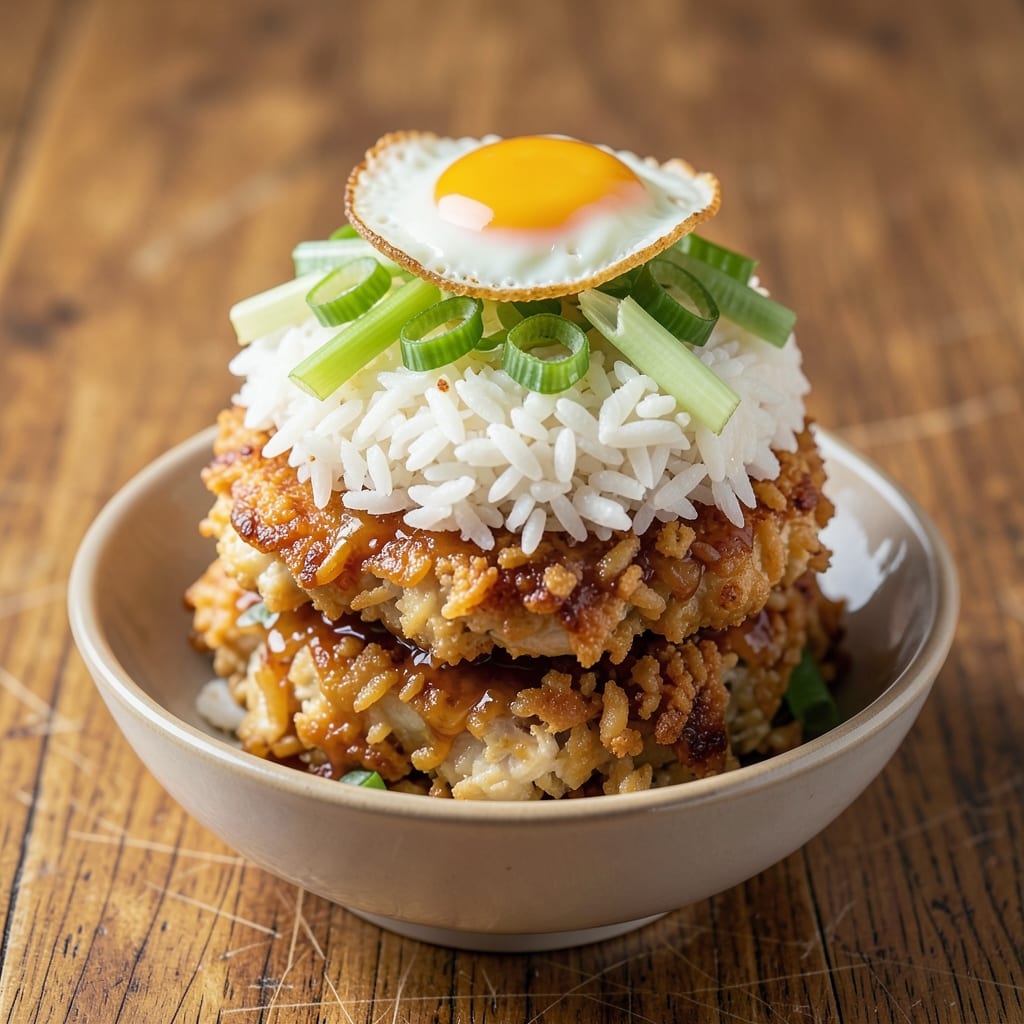
This bang bang chicken fried rice stack delivers the ultimate comfort-food experience—crispy celery-crusted chicken, fluffy fried rice, and rivers of golden yolk sauce. 🔥 I developed this recipe after perfecting the crispy chicken technique at The Smoky Pig, where we transform simple ingredients into restaurant-quality bites. The secret lies in the celery crust, which adds a satisfying crunch that contrasts beautifully with the creamy fried rice and runny yolk center.
The beauty of this dish is in its layers—each component plays a role in creating that perfect bite. The chicken is double-fried for maximum crispiness, the fried rice is seasoned just right to balance the bold flavors, and the sauce ties everything together with its tangy, creamy richness. What makes this stack special is the way the crispy chicken holds up to the sauce, soaking it up without losing its texture, while the rice stays fluffy and the yolk remains perfectly runny.
By the time you assemble this stack, you’ll have a dish that looks as impressive as it tastes—golden, crispy, and dripping with sauce. The celery crust adds a bright, fresh contrast to the richness of the fried rice and chicken, making every bite a harmonious blend of textures and flavors. This is the kind of dish that feels indulgent yet comes together with precision and care.
Perfect for a weekend brunch or a casual dinner with friends, this stack is designed to impress without requiring advanced skills. The technique is straightforward, but the result is undeniably restaurant-worthy. Let’s get cooking—your taste buds will thank you.
Ingredients for bang bang chicken fried rice stack
Crispy celery-crusted chicken, fluffy fried rice, and rivers of golden yolk sauce—this stack is pure comfort food magic.
| Ingredient | Amount | Notes |
|---|---|---|
| Boneless Chicken Breast 🍗 | 1 ½ lb | Pounded to even thickness |
| Celery Stems 🧅 | 2 cups | Finely chopped, fresh preferred |
| All-Purpose Flour 🌾 | ½ cup | For dredging chicken |
| Large Eggs 🥚 | 2 whole | Beaten for coating |
| Cooked White Rice 🍚 | 3 cups | Day-old preferred, cold |
| Green Onions 🧅 | ½ cup | Sliced, white and green parts |
| Garlic Cloves 🧄 | 4 cloves | Minced for rice |
| Soy Sauce 🍶 | ¼ cup | Light or regular |
| Sesame Oil 🫒 | 1 tbsp | For aroma, toasted |
| Vegetable Oil 🫒 | 3 cups | For frying, high smoke point |
| Bang Bang Sauce 🍶 | ¾ cup | Store-bought or homemade |
| Large Egg Yolks 🥚 | 4 whole | Fresh, room temperature |
| Salt 🧂 | 1 tsp | Kosher or sea salt |
| Black Pepper 🌶️ | ½ tsp | Freshly ground |
| Sriracha 🔥 | 1 tbsp | Adjust for heat preference |
The celery crust is your secret weapon—fresh, crisp celery from the produce section makes all the difference. Trader Joe's or your local Asian market usually have the best quality, but any bright green stalks work. Chop it super fine so it blends into the crust like magic. The chicken needs to be pounded even—use a meat mallet or rolling pin, or even a heavy pan. If you're short on time, pre-shredded celery (the good stuff, not the pre-mixed kind) works in a pinch, but fresh is always better for that bright crunch.
No store-bought Bang Bang sauce? Mix mayo, sriracha, and a splash of soy sauce—that's the classic combo. For the rice, day-old rice is key—it's drier and won't turn mushy. No day-old rice? Spread freshly cooked rice on a tray and pop it in the fridge for 30 minutes. The yolks should be fresh and room temperature—cold yolks won't emulsify as nicely. Want extra richness? Add a dash of mayo to the fried rice while it's hot. And if you're feeling fancy, toast your sesame oil in a dry pan for 30 seconds before adding it to the rice—game changer.
This stack reheats beautifully—just pop it under the broiler for 2-3 minutes to get that crispy crust back. Store components separately: keep the fried rice and chicken in airtight containers for up to 3 days, and the sauce in a sealed jar. The celery crust stays crispy for 24 hours if you refrigerate the chicken uncovered on a wire rack. Assemble just before serving so the yolk stays runny. Freeze the chicken and rice separately for up to 3 months—thaw overnight in the fridge before reassembling.
Why You'll Love This Recipe
- Stacks in Minutes: I swear, the crispy chicken patties form in five minutes—just dip the breast in flour, fry until golden, and stack. No waiting, no fuss, just that satisfying crunch with every bite.
- Celery Crunch Magic: That raw celery in the fried rice? It’s the secret. The slight bite cuts through the richness of the chicken and eggs, making every mouthful feel fresh and balanced—like a hug for your taste buds.
- Lunchbox Hero: Between us, this is my go-to for packed lunches. The stacks hold up perfectly, and the rice stays fluffy even after a day. Toss in some soy sauce packets, and suddenly you’ve got a meal that’s both impressive and effortless.
- Budget Win: Chicken breast and rice stretch forever—I make enough for four meals from one batch. Plus, the flour and eggs are pantry staples, so you’re not breaking the bank for a dish that tastes like you spent hours on it.
Step-by-step instructions for bang bang chicken fried rice stacks
Here's how to build these addictive stacks with crispy celery-crusted chicken and rivers of runny yolk.
👨🍳 Step 1: Create the Celery-Crusted Chicken
Start by pounding the 1.5 lb boneless chicken breast to an even ¼-inch thickness between two sheets of plastic wrap. This ensures even cooking and maximum crispiness. Season both sides generously with 1 tsp salt and 0.5 tsp black pepper, then dredge lightly in 0.5 cup all-purpose flour, shaking off any excess.
Heat 1 cup vegetable oil in a large skillet over medium-high heat until it shimmers. Working in batches, add the chicken and cook for 3-4 minutes per side until golden brown and cooked through. Transfer to a paper towel-lined plate to drain. Here's the secret: while the chicken rests, finely chop 2 cups celery stems and mix with 1 tbsp sesame oil and 1 tbsp sriracha. Spread this mixture on a plate, then press each piece of chicken into the celery mixture, coating both sides completely. Let sit for 5 minutes to adhere.
🍳 Step 2: Prepare the Bang Bang Sauce Base
In a small bowl, whisk together 0.75 cup bang bang sauce, 0.25 cup soy sauce, and 1 tbsp sriracha. Taste and adjust seasoning if needed—this sauce should be bold and slightly spicy. Set aside while you work on the fried rice.
In a separate small bowl, beat the 4 whole large egg yolks until smooth and pale yellow. This will be the magical element that creates those glorious yolk rivers when we assemble the stacks. Keep it at room temperature for best results.
🥘 Step 3: Cook the Celery-Crusted Fried Rice
Heat 1 tbsp vegetable oil in a large wok or skillet over medium-high heat. Add the celery-crusted chicken pieces and cook for 2 minutes until heated through. Remove chicken and set aside.
In the same pan, add 1 tbsp sesame oil and 4 minced garlic cloves. Stir-fry for 30 seconds until fragrant. Add the 3 cups cooked white rice, breaking up any clumps. Stir-fry for 2-3 minutes until the rice is heated through and slightly crispy in spots. Season with 1 tsp salt and 0.5 tsp black pepper, then stir in the 0.5 cup sliced green onions.
🥘 Step 4: Assemble the Bang Bang Chicken Stacks
Return the chicken to the rice mixture and gently toss to combine. The heat from the rice will help the celery crust re-crisp slightly. Divide the mixture evenly among 4 plates, creating a thick layer in each.
Here's where the magic happens: drizzle each stack with about 2 tablespoons of the prepared bang bang sauce. Then, carefully place 1 whole beaten egg (from the 2 whole large eggs) on top of each stack. The egg will create that perfect runny yolk center when served.
🔥 Step 5: Finish and Serve Immediately
Place the assembled stacks under a broiler for 2-3 minutes until the egg whites set slightly but the yolks remain runny. Watch closely—they cook fast! Remove from the broiler and immediately drizzle each stack with the remaining bang bang sauce.
Garnish with additional green onions and serve right away. The contrast of crispy celery-crusted chicken, creamy fried rice, and rivers of runny yolk creates an explosion of textures and flavors in every bite. These stacks are best eaten immediately while everything is hot and the yolk is still liquid gold!
Pro Tips For Making Bang Bang Chicken Fried Rice Stack
- CRISP THE CHICKEN FIRST: Cut the boneless chicken breast into thin strips—about ¼-inch thick—then dredge in flour and fry in 350°F oil for 4-5 minutes until golden. I used to skip this step and just toss the raw chicken into the fried rice, but the texture suffers—you want that crispy bite in every layer of the stack.
- SLICE CELERY THIN: Bang bang sauce needs celery for that signature crunch, but thick sticks turn mushy. Shave the celery stems into paper-thin matchsticks with a sharp knife—no mandoline needed. Trust me, you’ll taste the difference when the stack holds together.
- STOP STIRRING THE RICE: Once the rice hits the pan, let it sit untouched for 30 seconds. Stirring too soon makes it gummy. After that, keep the heat medium and fold gently—just enough to warm through, not mash. Overworking the rice kills the stack’s structure.
- USE COLD RICE: Day-old rice is your friend here, but if you’re using fresh, chill it in the fridge for 20 minutes first. Cold rice absorbs the bang bang sauce better and won’t turn to glue when stacked. Pro move: Spread it on a tray to cool faster.
Serving suggestions for this recipe
Plating Perfection
Start with a white or neutral plate to make the golden fried rice and crispy chicken pop. I use 10-inch ceramic plates from my Charleston market—they’re sturdy and show off the dish beautifully. Mound the fried rice mixture in the center, creating a tall, slightly uneven stack so it looks inviting and substantial. The height is key—it makes the dish feel restaurant-quality. 🥗
Sauce Rivers
Don’t just drizzle the bang bang sauce—create thick rivers that pool around the stack. Use a spoon to scoop sauce and let it cascade down the sides for that dramatic, saucy effect. For extra flair, add a small dollop of sauce on top of the yolk before broiling so it bubbles up when served. This is where the dish gets its signature "rivers of yolk" look.
Garnish Like a Pro
Fresh green onions are non-negotiable—they add color and a bright finish. I like to fan them out around the stack or sprinkle them on top for a herbaceous contrast. For an extra touch, add crushed red pepper flakes or toasted sesame seeds to highlight the spicy, nutty notes. The garnish should feel intentional, not scattered.
Broiler Finish
Watch the broiler like a hawk—you want the egg whites to set just enough to hold the yolk in place, but the center should still be liquid and golden. If the yolk starts to firm up too quickly, cover the plate loosely with foil for 30 seconds to slow cooking. The broiler should be on high heat, about 6 inches from the element. This final step is what transforms the dish from good to unforgettable. ✨
Serving Style
For a casual brunch, serve these stacks on a wooden board with extra bang bang sauce for dipping. For a fancy dinner, arrange them on a slate platter with pickled vegetables and steamed bok choy on the side. The presentation should match the vibe—whether it’s a weekend family meal or a dinner party, the stacks should feel like the star of the show. 💛
Nutrition facts
Frequently asked questions
Why does the chicken need to be pounded so thin?
Pounding the chicken to ¼-inch thickness ensures it cooks evenly and develops that perfect crispy crust. Thicker pieces would stay undercooked inside while the outside burns. This technique also helps the celery coating adhere better, creating that satisfying crunch in every bite.
Can I make this recipe with leftover fried rice?
Use day-old fried rice for best texture—it's drier and won't turn mushy when reheated. If using fresh rice, spread it on a tray and chill for 30 minutes first. Just be sure to crisp it up again in the pan before assembling the stacks.
How do I keep the celery crust from falling off?
Press the chicken firmly into the celery mixture and let it sit for 5 minutes before frying. The sriracha in the celery mix acts as a binder. For extra adhesion, lightly spray the chicken with cooking spray before pressing into the celery—this creates a temporary sticky layer that helps the coating stick.
What's the best way to reheat these stacks?
Reheat under the broiler for 2-3 minutes to restore crispiness. For microwave reheating, cover with a damp paper towel and heat for 30 seconds, then finish under the broiler. The key is quick, high-heat reheating to prevent sogginess—never microwave uncovered.
Can I substitute chicken thighs for breasts?
Yes, but adjust cooking time to 5-6 minutes per side since thighs are thicker and darker meat. For extra crispiness, pat them very dry first and consider brining for 30 minutes before coating. The celery crust will work just as well—just monitor closely to avoid overcooking.