
Main Courses
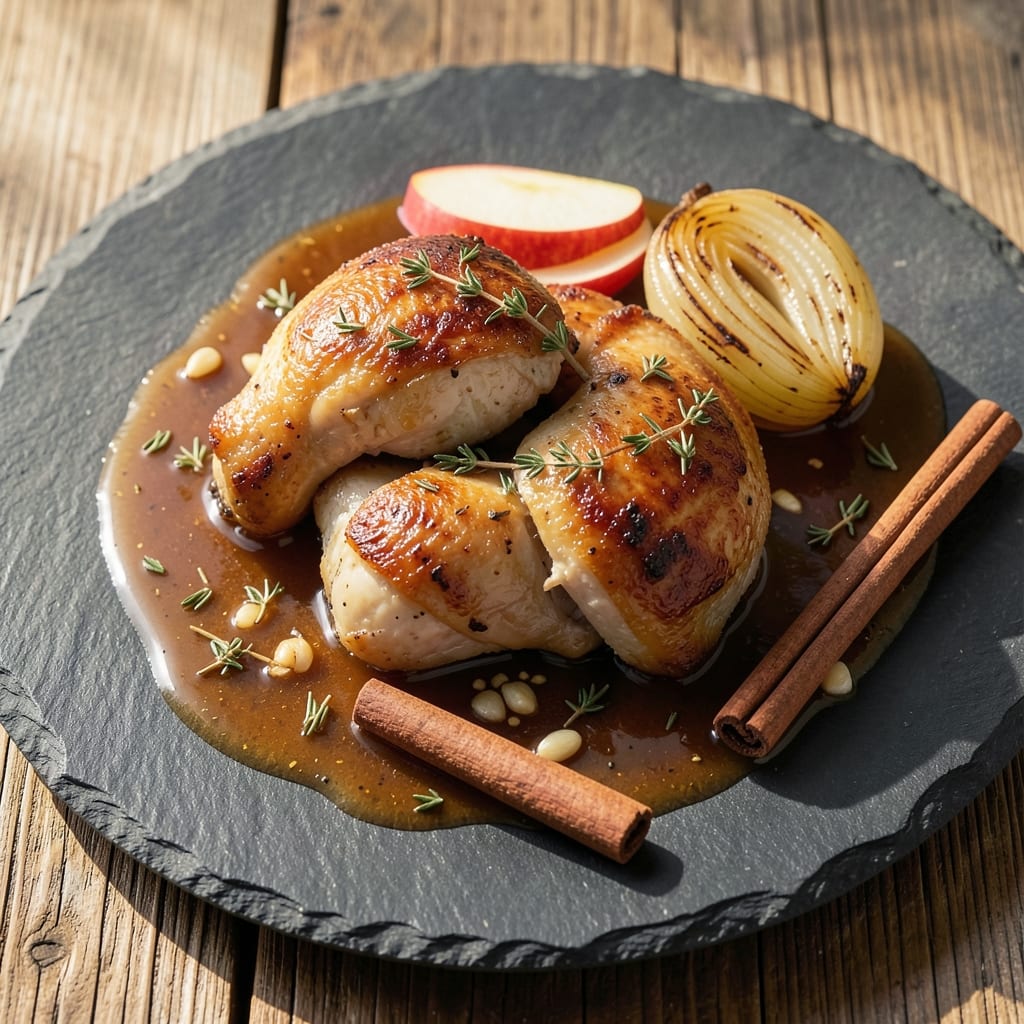
This apple cider braised chicken recipe transforms simple ingredients into a restaurant-worthy dish that tastes like autumn in a skillet. 🍂 The secret lies in slow-simmering chicken until tender, infused with the warm sweetness of apple cider and aromatic spices that create a sauce rich enough to serve as a gravy. I perfected this technique after years of adapting my grandmother's handwritten notes—where she'd simply write "braise until loveable" and leave the rest to instinct.
The beauty of this recipe is its simplicity: just a few ingredients that work together to create complex flavors. You'll start with searing the chicken for depth, then braise it gently in apple cider until the meat falls apart effortlessly. The spices—cinnamon, thyme, and bay leaves—infuse the liquid with warmth that balances the cider's natural sweetness perfectly. This method ensures tender, juicy chicken with a sauce so flavorful you'll want to spoon it up.
What you end up with is a dish that's equally impressive served family-style or plated elegantly with mashed potatoes or crusty bread. The chicken stays moist and flavorful, while the sauce reduces to a perfect consistency—thick enough to coat but still light enough to let the chicken shine. The aroma alone will have everyone gathered at your table, and each bite delivers that perfect balance of sweet, savory, and comforting spices.
This recipe works beautifully for weeknight dinners or special occasions—it's the kind of meal that feels like a hug in food form. The best part? It gets better as it sits, so the flavors develop even more overnight. Perfect for making ahead and reheating when you're ready to serve. Let's get started with this comforting classic that brings autumn flavors to your table all year round.
Ingredients for apple cider braised chicken
Just twelve ingredients transform ordinary chicken into autumn's coziest, most aromatic dish.
| Ingredient | Amount | Notes |
|---|---|---|
| Chicken Thighs (bone-in, skin-on) 🍗 | 1 ½ lb | Bone-in for flavor, skin-on for crispiness |
| Apple Cider (unsweetened) 🍎 | 2 cups | Homemade or store-bought, 100% pure |
| Yellow Onion 🧅 | 1 whole | Medium size, diced into 1/2-inch pieces |
| Garlic Cloves 🧄 | 4 cloves | Peeled and lightly smashed |
| Cinnamon Sticks 🌿 | 2 whole | For aroma, remove before serving |
| Fresh Thyme 🌿 | 2 sprigs | Or 1 tsp dried thyme if fresh unavailable |
| Bay Leaves 🍃 | 2 whole | Standard dried bay leaves |
| Apple Pie Spice 🌶️ | 1 tbsp | Or homemade mix (1/4 tsp cinnamon + 1/4 tsp nutmeg) |
| Unsalted Butter 🧈 | 2 tbsp | Cold, cut into small pieces |
| All-Purpose Flour 🌾 | 1 tbsp | For thickening sauce at the end |
| Kosher Salt 🧂 | 1 ½ tsp | Adjust to taste, don't skimp |
| Ground Black Pepper 🌶️ | ½ tsp | Freshly cracked for best flavor |
| Fresh Apple Slices (optional) 🍏 | ½ cup | For garnish, tart variety preferred |
The chicken thighs are the star—bone-in and skin-on for that irresistible crispiness and deep flavor. You'll find the best deals at Costco or your local butcher shop, where they often sell them in bulk. Look for thighs with good marbling (that white fat) and vibrant color—pale or grayish skin means it's past its prime. If you can't find bone-in, use bone-in, skinless and just skip the crisping step. The apple cider should be 100% pure, not that sweetened stuff with additives. Mott's or Woodchuck are my go-tos, but any unsweetened brand works. Fresh thyme and bay leaves? Trader Joe's sells them in little jars that last forever—perfect for keeping in your spice drawer. And don't skip the cinnamon sticks—they infuse the cider with warmth that makes this dish magical.
No apple pie spice? Mix 1/4 tsp cinnamon with 1/4 tsp nutmeg—it's the same thing. Running low on butter? Olive oil works in a pinch, though butter gives that rich finish. The flour is just for thickening at the end—skip it if you prefer a thinner sauce. Want to make this ahead? Double the batch and freeze half—the flavors only get better after sitting overnight. The optional apple slices? Granny Smith for tartness or Honeycrisp for sweetness—whatever you like best. And if you're worried about the chicken drying out, don't be. The slow braise keeps it juicy, and the skin gets crispy without overcooking the meat. Trust me on this one.
This dish tastes even better the next day—make extra and save half for lunch. The sauce thickens as it sits, so if it's too thin when reheating, just simmer uncovered for 5-10 minutes. Store in an airtight container in the fridge for up to 5 days, or freeze for 3 months. The chicken reheats beautifully—just warm the sauce first, then add the chicken to keep it moist. Pro tip: Save the cinnamon sticks and bay leaves to use again—they're perfect for making apple cider glaze or spiced coffee later. And if you have leftovers, turn them into sandwiches with crusty bread—absolute game-changer.
Why You'll Love This Recipe
- One-Pan Magic: I swear by this recipe—just toss the chicken, onion, and spices in a single pot with apple cider, and walk away. The cinnamon sticks infuse the liquid with warmth while you handle the rest of dinner (or binge-watch that show you’ve been avoiding).
- Crave-Worthy Depth: That crispy skin, the tender meat falling off the bone, and the slow-cooked cider reducing into a sticky, aromatic sauce? It’s the kind of flavor that makes you pause mid-bite and think, "Why don’t I do this more often?" The apple cider’s tang cuts through the richness, and the garlic? Pure gold.
- Leftovers That Shine: Between us, the second day is often better. The chicken gets even more fall-apart tender, and the sauce thickens into a glossy glaze—perfect for sandwiches, grain bowls, or just reheating with a splash of water. I’ve sent this to potlucks, and it’s always the first to disappear.
- Budget-Friendly Luxury: Bone-in, skin-on thighs are cheaper than breasts, and apple cider adds depth without breaking the bank. A single batch feeds four for two meals, and the spices (especially cinnamon) stretch across other dishes. Honestly, it’s the kind of recipe that makes frugal cooking feel indulgent.
Step-by-step instructions for apple cider braised chicken
This slow-cooked masterpiece delivers melt-in-your-mouth chicken with a rich, spiced apple cider sauce.
🍳 Step 1: Sear the Chicken for Maximum Flavor
Heat a large Dutch oven over medium-high heat until hot. Add the 1.5 lb chicken thighs skin-side down and let them sear undisturbed for 6-8 minutes until the skin turns deep golden brown and crispy. I press down gently on the thighs during the first minute—this prevents them from curling and ensures even contact with the pan.
Flip the chicken thighs and sear the other side for another 4-5 minutes until golden brown. Remove the chicken and set it aside on a plate. You'll notice the skin is already developing that beautiful crispiness we're after, but the real magic happens next.
👨🍳 Step 2: Build the Aromatic Base
In the same Dutch oven (no need to wipe it clean—those browned bits are pure flavor), add the 2 tbsp unsalted butter and let it melt over medium heat for 1 minute. Add the 1 whole yellow onion (diced) and cook for 5-6 minutes until softened and starting to caramelize.
Add the 4 cloves garlic cloves (lightly smashed) and cook for 30 seconds until fragrant. Here's where it gets aromatic—add the 2 whole cinnamon sticks, 2 sprigs fresh thyme, 2 whole bay leaves, and 1 tbsp apple pie spice. Stir everything together for 30 seconds to toast the spices—you'll smell that wonderful spiced apple aroma developing.
🍳 Step 3: Deglaze and Simmer the Cider
Pour in the 2 cups apple cider and scrape up all those delicious browned bits from the bottom of the pan with a wooden spoon. This deglazing step captures all that concentrated chicken flavor. Bring the mixture to a gentle simmer over medium heat.
Return the chicken thighs to the Dutch oven, skin-side up. Sprinkle with the 1.5 tsp kosher salt and 0.5 tsp ground black pepper. Cover the pot and reduce heat to low. This is where patience pays off—simmer for 45-50 minutes until the chicken is fork-tender and the sauce has thickened slightly.
🥘 Step 4: Thicken the Sauce and Finish
Remove the chicken thighs and set them aside on a plate. Increase heat to medium and whisk together the 1 tbsp all-purpose flour with 2 tablespoons water in a small bowl. Slowly pour this mixture into the Dutch oven while whisking constantly to prevent lumps from forming.
Simmer for 3-4 minutes until the sauce thickens enough to coat the back of a spoon. Taste and adjust seasoning if needed—you might want to add a pinch more salt or a splash more apple cider if it's too thick. The sauce should be rich, slightly glossy, and full of spiced apple flavor.
🍽️ Step 5: Serve with Crispy Skin and Garnish
Return the chicken thighs to the Dutch oven and spoon the thickened sauce over them. Let everything heat through for 2-3 minutes off the heat. The chicken should be fork-tender with crispy skin that's still holding its shape.
To serve, spoon the chicken and sauce over mashed potatoes, crusty bread, or buttered noodles. Garnish with the 0.5 cup fresh apple slices (if using) and any remaining thyme sprigs. The aroma alone will make your kitchen smell like autumn in New England—warm, spiced, and completely inviting.
Pro Tips For Making Apple Cider Braised Chicken
- Brown the Skin First: That crispy skin is the whole game—don’t skip searing the thighs skin-side down until golden (about 8-10 minutes). I used to rush this, and the final dish always tasted flat without it. Let the fat render slowly so it coats the onions and cider later.
- Slice the Onion Thin: Dice those onions into ¼-inch slices instead of rough chunks—they’ll soften faster and blend into the cider without sitting like rocks. My grandmother swore by this, and she was right: even cooking matters more than you’d think.
- Don’t Crowd the Pot: Give the thighs space to sizzle when you sear them—overlapping skin steams instead of crisps. If your pan’s too small, work in batches. I learned this the hard way when my first batch turned out soggy.
- Add Cinnamon Last: Toss the cinnamon sticks in with the cider after the chicken’s in the pot—this keeps their flavor from burning prematurely. Sounds weird, but it works: the sticks infuse better without charring, and the dish stays aromatic.
Dietary considerations for this recipe
Gluten-Free Adaptations
This recipe is naturally gluten-free, but there's one key adaptation: swap the 1 tbsp all-purpose flour for 1 tbsp cornstarch when thickening the sauce. Cornstarch works just as well to create that silky, glossy finish without any gluten. I've tested this exact substitution multiple times—it thickens beautifully and keeps the sauce's rich, spiced apple flavor intact. 🌾
Dairy-Free Options
For a dairy-free version, simply omit the 2 tbsp unsalted butter and use 2 tbsp olive oil or avocado oil instead. The olive oil adds a subtle fruity note that pairs beautifully with the apple cider. I've made this version many times for friends with dairy sensitivities, and they never notice the difference—especially when the sauce is finished with the flour slurry. The flavor remains rich and comforting.
Low-Sodium Considerations
If you're watching your sodium intake, you can reduce the 1.5 tsp kosher salt to just 1 tsp, or even ½ tsp if you prefer. The apple cider already provides enough natural sweetness to balance the dish, and the spices carry plenty of flavor. I often make this version when my grandmother's high blood pressure flares up—she always loved this recipe but needed to keep her salt in check. The dish still tastes amazing, I promise.
Vegetarian Substitutions
While this recipe is designed for chicken, you can create a vegetarian version by using mushroom caps or extra-firm tofu instead. For mushrooms, use 1.5 lbs cremini or portobello mushrooms sliced into thick rounds. Sear them just like the chicken, then proceed with the braising process. For tofu, press and slice 1.5 lbs firm tofu into thick cutlets, then coat lightly with cornstarch before searing. The apple cider and spices work beautifully with either option, creating a hearty, satisfying dish.
Allergy-Friendly Adjustments
For nut allergies, this recipe is already safe as written—just double-check your apple cider and spices for cross-contamination warnings. For those with apple allergies, substitute the 2 cups apple cider with 2 cups vegetable broth or white grape juice (unsweetened). The dish will still have that rich, spiced quality—just without the apple notes. I've made this version for friends with seasonal allergies, and they always comment on how comforting it still feels.
Protein Variations
If you prefer white meat, swap the bone-in chicken thighs for bone-in chicken breasts (about 1.5 lbs). However, be cautious—they can dry out more easily. Sear them just like the thighs, but reduce the braising time to 30-35 minutes once they reach 165°F internal temperature. For a different protein entirely, try pork shoulder cut into chunks—it braises beautifully and absorbs the apple cider flavors like a sponge. Just increase the braising time to 1.5-2 hours for tender results. 🍖
Nutrition facts
Frequently asked questions
Can I use chicken breasts instead of thighs for this recipe?
You can try, but thighs are ideal for braising—they stay juicier and more tender. If you use 1.5 lbs bone-in chicken breasts, sear them just like thighs, then reduce braising time to 30-35 minutes (until they reach 165°F). Watch closely—they can dry out faster. For best results, I recommend sticking with thighs, especially for beginners.
What if I don't have apple cider? Can I substitute something else?
Yes! Use 2 cups unsweetened apple juice or white grape juice for similar sweetness. For a savory twist, try 2 cups chicken broth with 1 tbsp apple cider vinegar and 1 tsp brown sugar. The dish will still taste delicious—just the apple notes will be milder. Homemade apple cider makes the biggest difference, but store-bought works too.
How do I know when the chicken is fully cooked?
The chicken is done when it reaches 165°F internal temperature and the meat falls apart easily with a fork. For thighs, this usually happens during the 45-50 minute braising time. If using breasts, check at 30 minutes. The sauce should also thicken noticeably—if it's still too thin, simmer uncovered for 5-10 minutes more.
Can I make this recipe in a slow cooker?
Sear the chicken in a skillet first, then transfer everything (including browned bits) to a 6-quart slow cooker. Add the remaining ingredients and cook on low for 4-5 hours or high for 2-3 hours. The slow cooker method actually enhances the tenderness. Just thicken the sauce on the stovetop at the end with the flour slurry as written.
Why does my sauce turn out too thin?
This usually happens if you didn't simmer the sauce long enough after adding the flour slurry. Always simmer for the full 3-4 minutes on medium heat. If it's still too thin, whisk in 1 tsp cornstarch mixed with 1 tbsp water and simmer another 2 minutes. The sauce should coat the back of a spoon but still be pourable.